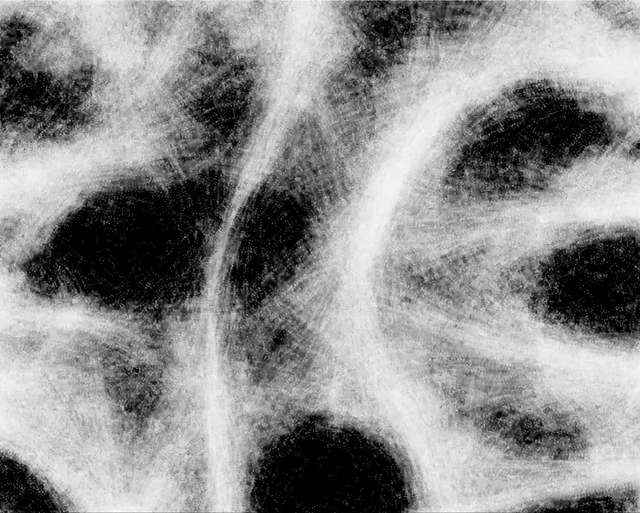
In 2021 I found this cool slime mold Physarum simulation, where particles formed organic patterns by following trails left by others and I was hooked. It looked mesmerizing and it somehow felt like time to build a neat simulation again.
In my past, I built many simulations and visualizations. Back then, this always involved using a framework and building an executable, usually in C/C++. This was okay if you wanted to run it on your own machine, but it made sharing with others a hassle. You don’t just send around executables, and most people don’t want to bother with compiling code themselves.
But I love to play around and let others experiment as well. For a long time, I wanted to run high-performance simulations in the browser with thousands of particles in the browser. Before WebGL2, doing this efficiently was too annoying for me. Keeping simulation data on the GPU was possible, but only when using texture and you really want to avoid slow data transfers between CPU and GPU. OpenGL had transform feedback for this, but WebGL1 did not. So I was super happy when WebGL2 finally landed in all major browsers in 2021. Around the same time, I saw Sebastian Lague’s video on the Physarum simulation which I thought was really cool, but built in Unity. Being the kind of engineer who avoids installing giant tools, I decided to build it myself – in the browser.
How the Simulation Works #
Simulating Physarum (slime mold) is conceptually simple:
- You have a bunch of “particles” (agents) that move around and leave a trail behind them.
- Each particle senses the concentration of trails (left by others) ahead, to the left, and to the right.
- The particle moves in the direction where the trail is strongest, plus some randomness.
- Over time, these simple rules generate complex, organic structures reminiscent of real Physarum patterns.
I used Vertex Shaders for simulating particles which is kinda common especially without any WebGPU back then (general purpose GPU shaders). Everything that is working more in a 2D grid or on a picture like drawing the trails and diffusing them is done in a Fragment Shader (sometimes also known as Pixel Shader from the DirectX world).
There are three main steps in the simulation loop:
1. Movement (Vertex Shader with Transform Feedback) #
All particles are updated in parallel on the GPU using the vertex shader. WebGL2’s transform feedback allows us to write updated positions and velocities directly into GPU buffers, so we never have to move particle data back to the CPU.
Here’s a simplified version of the vertex shader logic:
#version 300 es
precision mediump float;

// uniforms are parameters that you define from the outside
uniform float u_TimeDelta;
uniform float u_SensorOffsetDst;
uniform float u_SensorAngleRad;
uniform float u_TurnSpeed;
uniform vec2 u_ImgSize;
// textures can also be parameters from the outside 😅
uniform sampler2D state; // The trail map

// input position and velocities, the core for every simulation.
// In the program these come from vertex buffer objects and are processed one by one in the vertex shader
in vec2 i_Position;
in vec2 i_Velocity;

// and the corresponding outputs
out vec2 v_Position;
out vec2 v_Velocity;

// simply look up the value on the texture in the given direction
float sense(vec2 agentPosition, float agentAngle, float sensorAngleOffset) {
    float sensorAngle = agentAngle + sensorAngleOffset;
    vec2 sensorDir = vec2(cos(sensorAngle), sin(sensorAngle));
    vec2 sensorPos = agentPosition + sensorDir * u_SensorOffsetDst;

    // Read the trail map at the sensor position
    float value = texture(state, sensorPos / u_ImgSize).x;
    return value;
}

void main() {
    vec2 velocity = normalize(i_Velocity);
    float angle = atan(velocity.y, velocity.x);

    // Sense trail strength in three directions
    float forward = sense(i_Position, angle, 0.0);
    float left = sense(i_Position, angle, -u_SensorAngleRad);
    float right = sense(i_Position, angle, u_SensorAngleRad);

    // Steer towards the strongest direction
    if (forward >= left && forward >= right) {
        // keep going straight
    } else if (left > right) {
        angle += u_TurnSpeed * u_TimeDelta;
    } else {
        angle -= u_TurnSpeed * u_TimeDelta;
    }

    // Move forward
    vec2 newVel = vec2(cos(angle), sin(angle));
    vec2 newPos = i_Position + newVel * u_TimeDelta;

    // Output new state
    v_Position = newPos;
    v_Velocity = newVel;
}
Transform feedback makes it possible to output the new positions and velocities directly into a new buffer, ready for the next frame, without leaving the GPU.
2. Trail Rendering (Fragment Shader) #
Each particle “paints” a trail onto a texture as it moves. This is done in a fragment shader, where each particle writes its position as a bright spot in the trail texture.
#version 300 es
precision mediump float;
out vec4 FragColor;

void main() {
    // If this pixel is close to a particle, brighten it
    float dist = length(gl_FragCoord.xy - particlePos);
    float intensity = exp(-dist * dist * 0.1);
    FragColor = vec4(intensity, intensity, intensity, 1.0);
}
3. Diffusion and Decay (Fragment Shader) #
To mimic the way slime mold chemicals diffuse and evaporate, we blur the trail map and slowly fade it out. This is also done in a fragment shader, using a simple box blur and a decay factor.
#version 300 es
precision mediump float;
uniform sampler2D previousState;
uniform vec2 ImgSize;
out vec4 FragColor;

void main() {
    vec2 uv = gl_FragCoord.xy / ImgSize;
    vec4 sum = vec4(0.0);
    // 3x3 box blur
    for (int dx = -1; dx <= 1; dx++) {
        for (int dy = -1; dy <= 1; dy++) {
            vec2 offset = vec2(dx, dy) / ImgSize;
            sum += texture(previousState, uv + offset);
        }
    }
    sum /= 9.0; // Average
    // Apply decay
    FragColor = sum * 0.97;
}
Running it! #
With WebGL2 and modern browser support, you can run thousands of particles at 60 FPS, all on the GPU and I really love that anyone can easily experiment in their browser. No installation, no builds, just playing with it by following a link.
While mine doesn’t quite reach Sebastian Lague’s outstanding quality, I’m proud of how it runs entirely in the browser and invites tinkering. This was a fun little project, and you can play around with it here:
Live Demo
If you’re curious, all the code is on GitHub. Try it out and see what strange, beautiful patterns you can generate!